This Knowledge Base article contains information for:
|
Before Semester and Progress reports can be written, the below steps must be completed:
|
These settings can only be seen by Administrators. The settings for reports can be changed at any time, even whilst Teachers would be marking them. |
From the main menu Go to; Reporting then click on F-10 to land on the Reporting Hub:

Click on the Management tile to the right of the screen
You are now able to view and change the settings for reporting. These settings are divided into separate tabs which you can toggle through near the top of the page. This section will go through each of the settings that can be found under each tab.
If you wish to save any changes while in a tab, click on the Save button at the bottom of each page.
If you navigate to a different tab without having saved your changes, the changes will be lost |
These settings affect both Semester and Progress reports, and allow you to change the formatting and comment structure as follows: |
F-10 Curriculum type: From here, either the Victorian Curriculum or Australian Curriculum can be chosen, which will be reflected in learning outcomes listed in reports
Limit the number of words that can be written for report comments: A word limit can be set for teacher comments in the interest of brevity
Adjust font size for all teacher comments in printed reports: A font and font size can be chosen from here, which will uniformly apply to all comments in all reports
Allow all teachers to print Reports: Allows teachers to print the PDF reports for all students they have access to for the current semester. If this is not selected, teachers will only be able to view the on-line version of the reports
Display class teacher(s) instead of the author for general comments? If multiple teachers run a classroom, all main teacher names will be displayed instead of the individual teacher writing the comment
Allow teachers to view other teachers Report Comments? If turned on, when teachers go into Current Reports they can see the comments other teachers have written for the students they have access to. If this option is turned off, teachers will only be able to view comments written for the classes they teach
Display teacher names for report comments written? The name of the teacher who wrote the comment will appear if Yes is selected for this option and will not appear if No is selected. If For Subject-Specific comments only is selected, General comments will have no teacher name next to them, but will show for each subject comment written
Allow Student Report PDF file uploading as an alternative to creating Reports on the uEducateUs system? Allows the option to upload reports for students manually as a PDF file (note: this will mean the reports will not be in a uniform format)
Allow disabled students to be marked for their Reports? Students who have left within the semester will require a report to be created for them as well
These settings affect Semester reports, and allow you to change the formatting and comment structure as follows: |
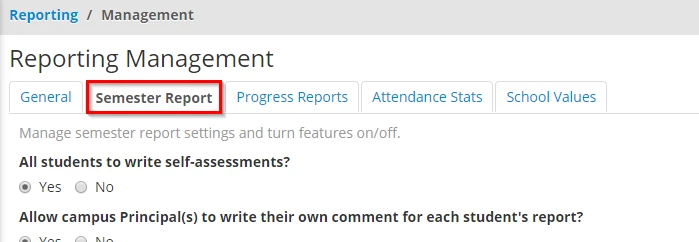
All students to write self-assessments? This option will turn on Student comments for reports; both the class teacher and the student themselves will be able to write the comment through Reporting once logged in.
Allow campus Principal(s) to write their own comment for each student's report? Turning on this option will allow Principals to write a comment on each student’s report (Note: only Principals and Administrators with permissions will have access to write this comment)
Allow end of year reporting from Homeroom classes? Allows comments to be written for classes that are created under the 'Homeroom' type setting. If no is selected, Homeroom classes will not be included in the student reports.
Show digital signatures on reports for: Allows digital signatures for Teachers and/or Principal to appear on the reports. Digital signatures can be updated from the Profiles of the teachers/principal
Allow front pages for Student End of Semester Reports? Specifies if a front cover is to display for each student semester report..
Select a front page template: If front pages are allowed, you will be able to choose between 4 front page templates
Display student portraits on front cover? This option allows student portraits imported into the system to be displayed on the front page of reports
Victorian Curriculum score table: This option allows schools to choose whether they wish to display the student’s scores using the progression-point table format, or to show their achievement in a 5-point scale table
Display 5-point-scale on Year Prep to 10 student reports? This option allows the school to either display their 5-point scale or not. Progression scores will still be displayed
5-point-scale to use: Schools can choose between the following scales: ABCDE, Above/Below Standard, Above/Below Expected Level, and Progression Point
Display F-10 year level columns in End of Semester Reports by: If Yes is selected, the progression-point table will display the year level of each column. Otherwise, the progression-point value is shown instead.
Mark student Curriculum Scores by: Allows schools to either mark scores by Learning Area (core competencies) for each subject, or by the one score for the subject. Please note that English, Maths and PE are always marked by learning area and are unaffected by this change.
Merge Learning Area Scores for Physical Education on Reports? Specifies if the learning area scores for PE display individually on the final student reports or as a merged score. Regardless of the setting chosen, PE learning area scores are still required to be marked individually by teachers.
Align dot points on graph by: If the dot points in the progression-point table display directly on the line of the table or in the center left/right of the columns.
Allow past Curriculum Scores to display on reports? Whether or not the previous Curriculum scores display in the progression-point table.
Past Curriculum scores are retrieved by: Specifies if past report scores display on student reports via the most recently marked score or the scores that were marked at minimum 12 months ago.
General comment types to allow for End of Semester Reports: From here, a school can choose the sub-comments that will appear in the General comment section of a student’s report
Subject comment types to allow for End of Semester Reports: This allows schools to choose whether comments for subjects will be split into General Subject comments, What Student Has Achieved and What Student Can Improve on.
Semester Report work habit scores to enable: This allows schools to choose which work habits students can be marked on in the Scoring part of the report
Allow Work Habit scores to be marked by: Work habits can either be marked by Class or by Subject
Allow Work Habit scores to print below specialist subject comments for Semester Reports? Whether or not work habit scores are shown per specialist class. Please note that this setting only affects specialist subjects that have been created as their own individual class in the system.
Printed student reports for Years Prep to 10 display class results by: A choice of different template options that will determine how the scores and comments of the report will display.
These settings affect Progress reports, and allow you to change the formatting and comment structure as follows: |
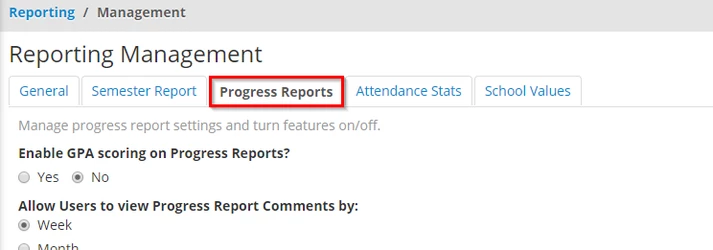
Enable GPA scoring on Progress Reports? This setting displays a GPA score to the top-right of the Progress report, based on the student's work habit scores
Allow Users to view Progress Report Comments by: Determines if comments are categorised by Week, Month or Term. If Term is selected, for example, users will be able to view all the comments written for a term via a student on one page.
Progress Report work habit scores to enable: There are 13 work habit types to choose from, and any of them can be enabled or disabled. Whichever work habits are enabled will allow teachers to mark the student on a 5-point scale on each work habit
Allow comments from Progress Reports to be imported into End of Semester Reports? When turned on, Progress Report comments that have been approved will automatically display in the Semester Reports for the students.
Attendance stats are displayed on Semester reports only |
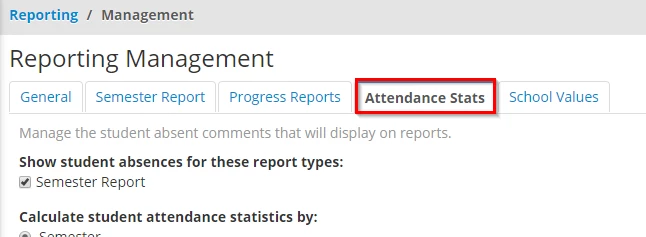
Show Student absences for this report type: This setting effectively turns Attendance Stat comments on or off for semester reports. If the check box is left empty, Attendance stat comments will not appear on the reports. If the checkbox has a tick, they will appear and you will see further options to edit how these comments appear
Calculate Student attendance statistics by: Whether student attendance statistics are calculated by semester or the entire year.
Select where to display student absences in the Semester Reports: You can choose to display the absence comments either below the teacher comments, or below the main scores table for the students.
This setting will be influenced by the Printed student reports for Years Prep to 10 display class results by setting in the Semester Reports tab
The School Values are displayed on Semester reports only |
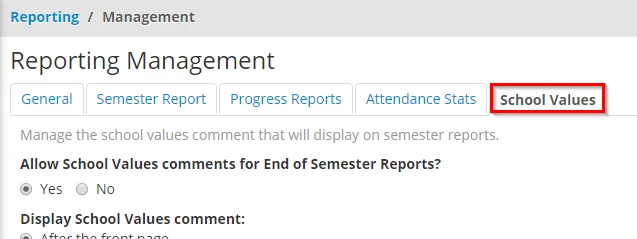
Allow School Values comments for End of Semester Reports? Choosing this option will add a page to Semester Reports which will display the school values as written in the text box.
Display School Values comment: This allows the admin to choose whether the School Values page is displayed after the front page, or after the main scores page in the Semester report.
The School Values comment will take up an entire page in the Report
In order to change the order that subjects appear in reports:
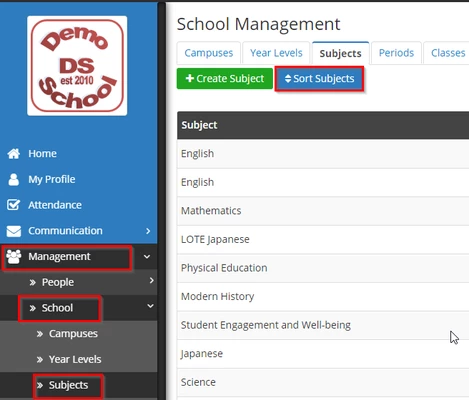
Click on Management from the side menu, then School, and then click on Subjects
On this new page, click on the blue Sort Subjects button at the top of the screen
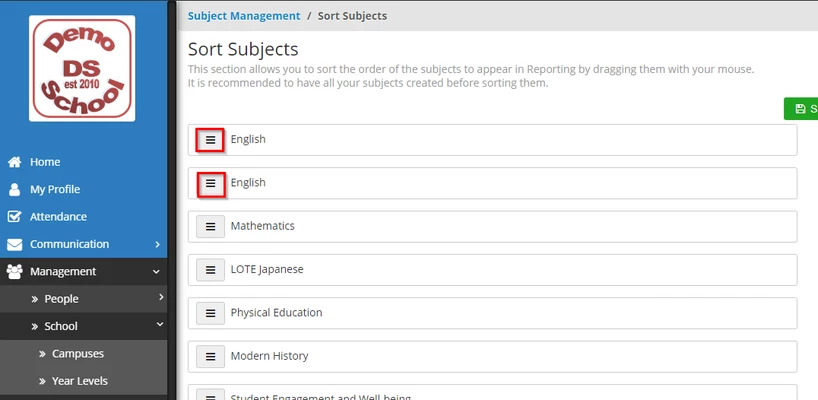
To edit the order of the subjects, click and hold on the 3-line icon to the left of each subject, then drag them either up or down
 |  |
|---|
Admins and teachers are able to set up a descriptor comment for each subject that will automatically appear on the Semester reports of each student that has that subject.
These comments can only be set up for the current semester, and will need to be re-written each semester if used. |
From the main Reporting Hub, click on Subject Descriptors:

You will be taken to the Subject Descriptors page. From here, you will be able to see a list of existing Subject Descriptors and will have the option to View them, Delete them, or Edit them. You will also be able to Create a new one:

If you click on Create or Edit, you will be taken to a screen where you will be able to choose the Subject the descriptor is for, and the Year Level range it will appear for. You can enter and edit the descriptor in the Description field:

All teachers are able to write subject descriptors for subjects that their classes take. Teachers who are able to write a subject descriptor are able to write them for any year level, regardless of which year levels they teach. |
If a student is to be marked against the EAL (English as an Additional Language) framework, the following steps are to be followed:
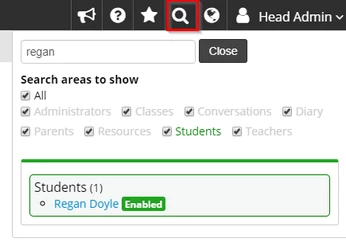
Search for the student using the Search function (magnifying glass icon) at the top of the screen, then click on their name to go to their profile:
Click on the Edit button, then click on the Reporting button in their profile:
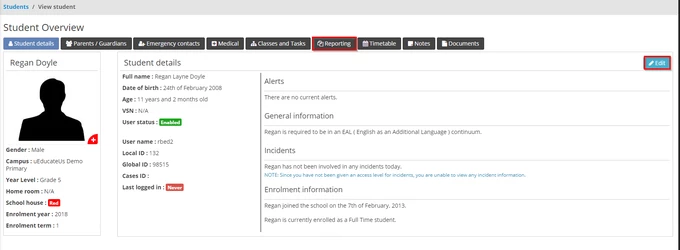
Tick the option This student is required to be under a EAL (English as an Additional Language) continuum:

Admins will be able to mark and write comments for all students within their campus, and teachers will be able to do the same for students within their own classrooms.
Return to the Reporting Hub, then click on the Mark End of Semester Report tile:

A list of students per class will be displayed, as well as their year level, whether their scores have been marked, and whether comments have been written.
A green Mark Student button will be present next to each student for individual marking, as well as a green Mark Scores for Selected button at the top of the student list for bulk marking:

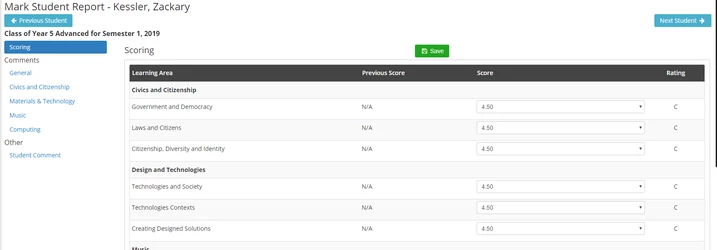
When clicking on Mark Student, you will land on the student's Scoring page, which will allow you to choose a score for each subject from a drop-down box. The student's previous score for the subject will also be displayed:
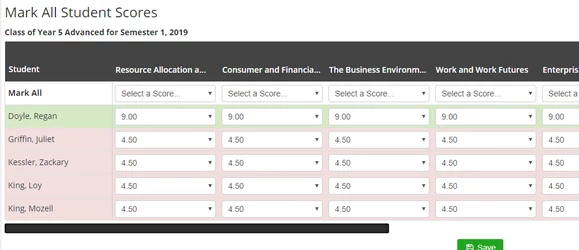
If clicking on Mark Scores for Selected in order to bulk mark students, the students selected will show up in a table, where each row will have a student specified, and each column will represent a subject. You will be able to choose a score for each subject from a drop-down box.
Each subject will also have a Mark All box, which will allow you to select the same score for all the listed students under that subject:
No further information will be shown for the students.
If you wish to bring up additional score options for the class (if any), you can bring them into view by doing one of the following:
Moving the scroll bar at the bottom of the table
Left-click, hold and drag the header of the table with the mouse
Once scores have been entered, click on the Save button on either page.
Teachers and Admins are both able to create and manage comment banks that can be used in both Semester and Progress reports.
From the main Reporting hub, click on Sample Comments:

On this screen, you'll be able to view comments that have been already created, as well the comment type, subject, performance type and creator.
Comments can be filtered by clicking on the Filter button and setting the filter parameters, and comments can also be searched for by name here.
Clicking on the View button will display the actual comment, and from here the Edit button can be selected:
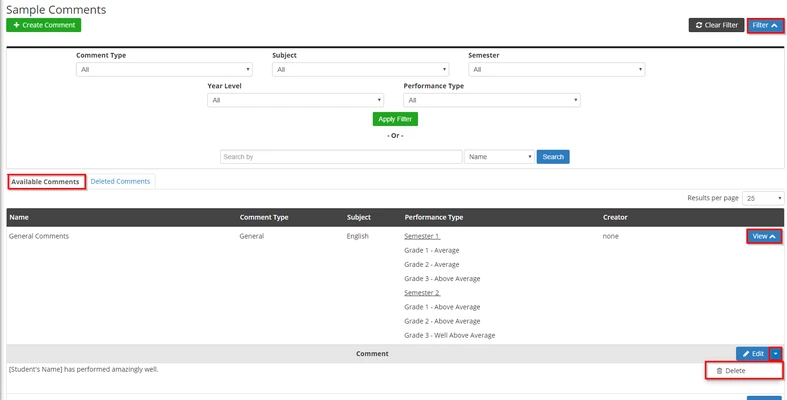
Clicking on the arrow next to the Edit button will bring up the Delete option. If you are an administrator, you will be able to view and restore deleted comments through the Deleted Comments tab:

On this screen, the comment can be retrieved by clicking on the Restore button, or permanently deleted by clicking on the Delete button.
If you click on Create Comment to create a new comment, or Edit to edit an existing comment, you will be taken to a screen that will look like the below:
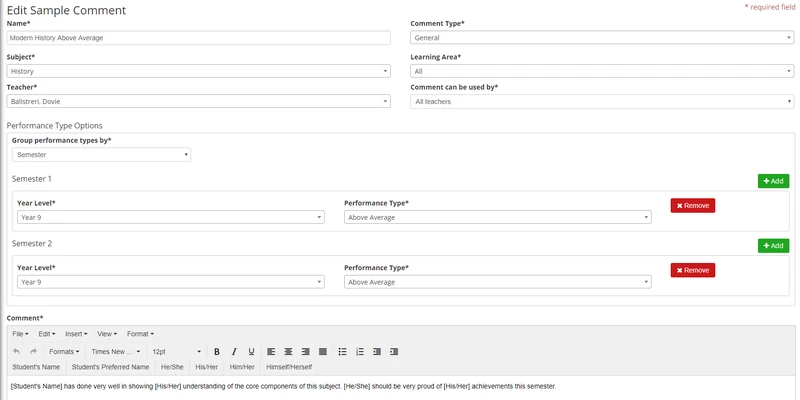
A Name for the comment will need to be entered, as well as the Subject and Learning Area. The Comment Type will also need to be selected, though leaving at General will allow the comment to be selected by all types.
If writing the comment as an Admin, the Teacher this comment is being written for will need to be selected. For Teachers, this option will not be available and will automatically assin you as the creator instead.
The Comment can be used by option will allow an Admin to choose whether All teachers or Only the Teacher of this comment will be able to use the comment. For Teachers, the options will be All teachers or Only Me.
If the comment is to be assigned to certain performance types, the comment can be selected to Group performance types by either Semester (which allows the performance type to be set by Semester, as well as Year Level and Performance type) or Year Level.
Multiple performance type and year level pairs can be assigned to a comment, or performance types can be removed altogether.
When writing the comment, name and pronoun buttons can be added in order for students' names and pronouns to be automatically added when using the comment in a report.
Return to the Reporting Hub, then click on the Mark End of Semester Report tile:

To write comments for each student individually, click on the Mark Student button to be taken to the student's report.
To the left of the page, each subject the student has taken can be clicked on, which will link to the comments section.
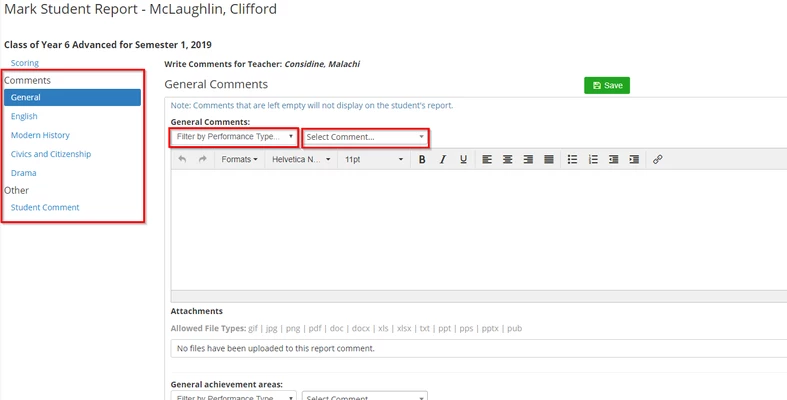
If required, select the Performance type from the first drop-down box, which will populate the Select Comment drop-down with relevant sample comments, which can be used to quickly write comments. Alternatively, you can type the name of the sample comment in the Select Comment drop-down if known.
Attachments can be uploaded to each comment if required, and will be accessible to view for users on the online view of the final report only.
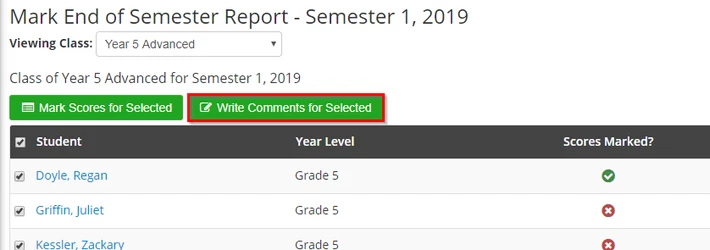
Comments can be bulk written by selecting the students to write the comments for, and then clicking on Write Comments for Selected:
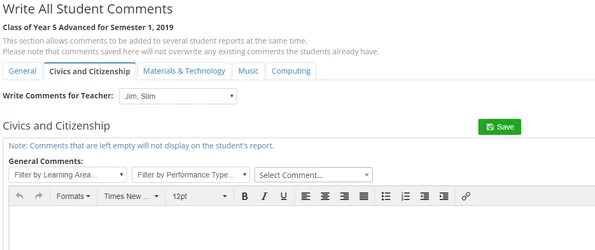
This option allows a Teacher or Admin to write the same comment for the students selected. The comments can be selected by Subject and written in the same way an individual comment will be written.
If using Sample Comments, the students' names and pronouns will also be populated.
If one or more of the selected students already have a comment written under a specified heading, their existing comment will not be overwritten once the save button is clicked.
Progress Reporting allows schools to optionally create comment-based reports to keep parents updated on a student's progress on a consistent basis throughout the year.
From the main Reporting hub, click on Create Progress Report:

As with Semester Reports, class lists of students are displayed and can be filtered to find particular students.
You will be able to see whether any comments have been written, and if any have been approved:

To edit or add comments to a report, click on Mark Student
On the next screen, you can view the Teacher that wrote a particular comment, the title and subject the comment is for, the date the comment is to reflect and whether the comment is in draft, or whether it has been approved.
An Admin will also be able to Approve or Reject selected comments. Each comment can also be viewed, edited or disabled.

Clicking on Write Comment will allow for the subject of a comment to be chosen, as well as the title and date of the comment.
Sample comments can be selected from the Comment drop-down boxes to assist with writing comments:
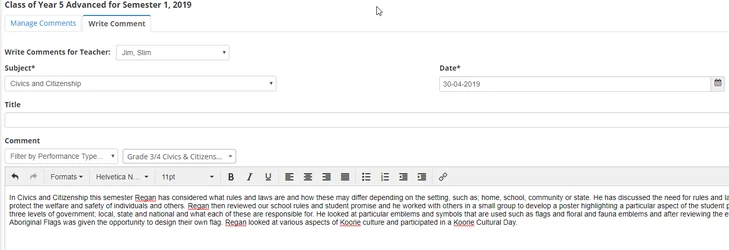
Depending on the Management settings chosen, performance indicators for Work Habits can also be set on this screen.
Approving reports can be done by returning to the Reporting Hub, then clicking on View Current Reports. Printing and viewing reports can be done from here too.
If you wish to approve a report for the previous semester, you can instead go to View Past Reports:

Approving reports effectively publishes the reports, and makes them visible to Parent and Student logins. Rejecting a report returns the report to the Teacher in order for them to modify it further.
Both Semester and Progress reports can be approved from the View Current Reports screen.
When in the Semester Report tab, Admins will have an Approve Options button, which will allow them to either approve selected reports, or approve all reports that are currently in Draft status. The Reject Options button allows the admin to reject all reports or selected reports.
Clicking on the arrow next to the View button for an individual report also allows admins to approve single reports:

To approve Progress Reports, admins will need to click on the Progress Reports tab in the View Current Reports screen, then click on the Approve Comments button.
In this new screen, Admins will be able to search for reports by selecting a Class, Term and Week. This will return progress comments in draft for the selected.
The Admin can then either click on the View button for each comment, or select the comments and click on the Approve Selected or Reject Selected button:

Once a report is approved, the comments and scores are locked and cannot be edited any further, and the report will become visible to the relevant Parents and Students. It is possible to Reject an Approved report however, which will allow teachers to modify the report again and will make the report disappear from Student and Parent logins |
For all logins, clicking on View Current Reports and View Past Reports from the Reporting Hub will have a list of relevant reports, and clicking on the View button will display the online version of the report.
The scoring conventions and comments visible will be per the settings selected in Management.
For both Semester and Progress reports, subject overview pages can be navigated from the Viewing Subject drop-down.
A Print button will also be available to make a paper copy of the report. The formatting of the paper report can be modified through Management settings.

Individual Semester reports can be printed with the following methods:
Clicking on View Current Reports and View Past Reports from the Reporting Hub, finding the Student, clicking on the arrow next to the View button and then selecting Print
Clicking on View Current Reports and View Past Reports from the Reporting Hub, finding the Student, clicking on the View button to enter the report, then clicking on the Print button
Admins and Teachers (depending on Management settings) are also able to bulk print Semester reports by clicking on View Current Reports and View Past Reports from the Reporting Hub, then clicking on the Print Options button. This will generate a pop-up:
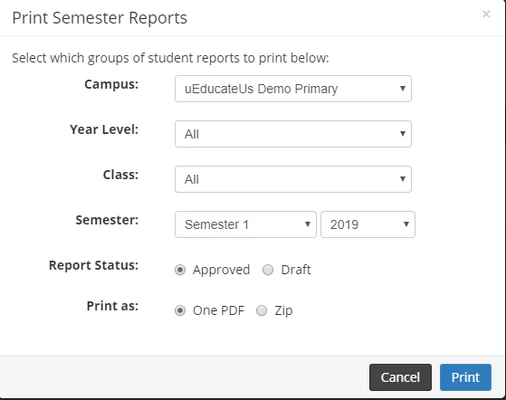
The Campus (if relevant), Year Level and Class of the reports to be printed can be selected from here. If viewing Past Reports, the Semester and year can be selected as well.
The Report Status needs to be chosen, so either Approved or Draft reports will be present in a batch of reports, not both.
Reports can be printed as One PDF document, or a Zip file which will generate a folder holding an individual PDF document of each report.
Please note that the bulk print functionality relies on the PDF reports to exist on the system’s provided servers, which are automatically generated as staff write and approve reports. If these reports have not been created yet, you will be brought to a waiting page instead. Once all the reports have been generated, your browser will automatically display or download the file for you.
Victorian Curriculum scoring definitions:
NT - Not Taught
DNP-EX, the EX represents “Exemption from a Curriculum Area”
DNP-LP where LP represents “Low Participation”
DNP-LE where LE represents “Late Enrolment”
DNP-SI where SI represents “Serious Illness”
DNP-UN where UN represents “Absence without Reasonable Excuse”